Arc Welding C++ SDK Usage Examples
Document Conventions
Each section follows this structure:
- Applicable Scenarios — When this scenario applies
- Objective — Expected system state when complete
- Recommended Steps — Ordered procedural highlights
- Common APIs and Types — Quick lookup for SDK symbols; not a full parameter table
- Notes — Common pitfalls
General Programming Conventions
- Obtain an
ArcWeldingreference viarobot.arcWelding()and call process-parameter and welder APIs on it; motion queueing remains onrobot. - Every API takes
error_code &ec(or an equivalent overload); checkecafter each call. - Welding trajectories that are queued then started typically use
MotionControlMode::NrtCommandwithmoveAppend/moveStart; distinguish this from parameter-only download scenarios.
Shared Prerequisites (Common to Sample Code in Each Scenario)
The following matches arcwelding_example.cpp lines 10–60 in the SDK package (including print_helper.hpp and the anonymous namespace with robot, arcWeld(), waitForFinish, etc.).
#include "rokae/arcwelding.h"
#include "rokae/robot.h"
#include "print_helper.hpp"
#include "rokae/data_types.h"
#include <unordered_map>
#include <thread>
#include <iostream>
#include <chrono>
#include <future>

using namespace rokae;
using namespace std;

#define ROKAE_EXE(CMD) \
CMD; \
if(ec) { print(std::cerr, __LINE__, __FUNCTION__, ":", ec.message()); }

namespace {
 xMateRobot robot;
 ArcWelding& arcWeld() {
   static ArcWelding v = robot.arcWelding();
   return v;
 }

 void waitForFinish(BaseRobot &robot, const std::string &traj_id, int index){
   using namespace rokae::EventInfoKey::MoveExecution;
   error_code ec;
   while(true) {
     auto info = robot.queryEventInfo(Event::moveExecution, ec);
     auto _id = std::any_cast<std::string>(info.at(ID));
     auto _index = std::any_cast<int>(info.at(WaypointIndex));
     if(auto _ec = std::any_cast<error_code>(info.at(Error))) {
       print(std::cout, "路径", _id, ":", _index, "错误:", _ec.message());
       return;
     }
     if(_id == traj_id && _index == index) {
       if(std::any_cast<bool>(info.at(ReachTarget))) {
         print(std::cout, "路径", traj_id, ":", index, "已完成");
       }
       return;
     }
     std::this_thread::sleep_for(std::chrono::milliseconds(200));
   }
 }

 std::ostream &operator<<(std::ostream &os, const ArcWelding::WelderStatus &data) {
   os << "Name: " << data.welding_name << ", Current: " << data.current << ", Voltage: " << data.voltage
   << ", Distance: " << data.welding_distance << ", Path num: " << data.welding_path_num << std::endl;
   return os;
 }
}
Scenario 1: Initial Robot and Welder Setup
Applicable Scenarios First arc-welding run on a new station, or after replacing the welder / fieldbus configuration, you need to verify that the controller and welder side are ready.
Objective The robot is connected; the arc welding process package is available; welder model and communication parameters match the site; IO and ENI expectations are configured when required.
Recommended Steps
The key steps relate as follows (they map to the subsections below):
-
connectToRobotestablishes the connection to the controller. -
Use
getWelderStatusto inspect the welder side: ifstateis"disabled"etc., no valid connection is established yet; if it is"ok"etc., the welder is ready (exact enumerations follow the API reference). -
If already connected: use
getWelderSettingto read the current protocol, brandmfr, modelmodel, current ratingcurrent_type, etc. -
To replace the welder or reconfigure parameters: call
disconnectFromWelderfirst, then follow the EtherCAT or analog branch below, reconfigure, and callconnectToWelderagain. -
EtherCAT welders:
setIsEniHaveWeldmust betrue(equivalent to whether a physical welder is connected on the HMI), then upload the welder’s ENI file in the HMI software. InsetWelder(orWelderSetting), setprotocolto the EtherCAT value (e.g."ethercat"per SDK convention),mfrto the vendor key in the table below,modelto the model key, andcurrent_typemust be one tier from that model’scurrent_range(aligned with the process package). If the model also constrainswire_diameter,shielding_gas,program_number,dry_extension,firmware_version, etc., those fields insetWeldermust come only from the allowed sets below.Vendor / model and current tiers (and optional constraints) (
mfrandmodelstrings when downloading must match these keys):
{
  "aotai": {
    "RL/RPL": { "current_range": [350, 500, 630, 800] },
    "RP/RPH": { "current_range": [350, 500, 630, 800] }
  },
  "megmeet": {
    "Artsen Plus": { "current_range": [350, 400, 500] },
    "Artsen Pro": { "current_range": [350, 400, 500] },
    "Ehave2": { "current_range": [350, 500, 630] },
    "Artsen3": { "current_range": [400, 500] },
    "Dex2": { "current_range": [350, 400, 500] },
    "Dex2 Ultra": { "current_range": [400] },
    "Megwave": { "current_range": [350, 400, 500] },
    "Megwave 400AC": { "current_range": [400] },
    "MetaTig": { "current_range": [315, 400, 500] },
    "RevoTig": { "current_range": [315, 400, 500] }
  },
  "riland": {
    "TiTans Low Spatter": {
      "current_range": [500],
      "wire_diameter": [0.8, 1.0, 1.2, 1.6],
      "shielding_gas": ["CO2", "80%Ar+20%CO2"]
    },
    "TiTans DP": {
      "current_range": [400, 500, 600],
      "wire_diameter": [0.8, 1.0, 1.2, 1.6],
      "shielding_gas": ["CO2", "80%Ar+20%CO2"]
    }
  },
  "panasonic": {
    "GS6": {
      "current_range": [350, 500],
      "program_number": [1, 97],
      "dry_extension": [10, 12, 15, 20, 25, 30, 35]
    }
  },
  "tayor": {
    "RB-350P": { "current_range": [350] },
    "RB-500P": { "current_range": [500] }
  },
  "headux": {
    "headux": { "current_range": [550] }
  },
  "beijingtime": {
    "time": { "current_range": [1000] }
  },
  "hugong": {
    "NVPM": { "current_range": [500] }
  },
  "ewm": {
    "TIG": { "current_range": [1000], "program_number": [0, 15] },
    "Plasma": { "current_range": [1000], "program_number": [0, 15] },
    "Phoenix": { "current_range": [1000], "program_number": [0, 15] },
    "alpha Q": { "current_range": [1000], "program_number": [0, 15] }
  },
  "bohler": {
    "URANOS NX": {
      "current_range": [3000, 4000, 5000],
      "firmware_version": ["v.14-v.24", "v.25"]
    }
  },
  "esab": {
    "Aristo 500ix": { "current_range": [500] }
  }
}
Example (Aotai RL/RPL, 500 A tier): mfr = "aotai", model = "RL/RPL", current_type = 500 (must be within [350,500,630,800]).
-
Analog welders: complete the following three steps in order, then
setWelder:- ① IO binding: call
setIOSettingfirst to map arc start, wire feed, wire retract, gas check, current/voltage set and feedback, welder ready, fault, etc. to actual DI/DO or registers. Verify withgetIOSetting. - ② Current / voltage curves: use
setCurrentCharacteristicCurveData,setVoltageCharacteristicCurveData(andcalculateCurrentCurve/calculateVoltageCurvewhen needed) to create and name curve data on the controller. - ③
setWelder: set protocol to analog (exact string per SDK / process package, e.g."analog");mfrmay only be"manual_welding"or"aotai";modelfollows the analog scheme;current_fileandvoltage_fileare the current curve name and voltage curve name from step ②. Other fields use defaults or leave empty per the API reference.
- ① IO binding: call
-
Call
connectToWelderto connect and enable the welder; usedisconnectFromWelderbefore reconfiguration or when finished debugging.
Sample Code
For analog welder configuration, see setIOSetting and setCharacteristicCurveData in the same example file.
// 选择焊机,启用焊接功能,断开焊机
void setWelderAndConnect() {
  cout << "enter setWelder" << endl;
  error_code ec;

  auto printWelderSetting = [](const ArcWelding::WelderSetting &welderSetting) {
    cout << "protocol: " << welderSetting.protocol << endl;
    cout << "mfr: " << welderSetting.mfr << endl;
    cout << "model: " << welderSetting.model << endl;
    cout << "current_type: " << welderSetting.current_type << endl;
    cout << "current_file: " << welderSetting.current_file << endl;
    cout << "voltage_file: " << welderSetting.voltage_file << endl;
    cout << "wire_diameter: " << welderSetting.wire_diameter << endl;
    cout << "shielding_gas: " << welderSetting.shielding_gas << endl;
    cout << "program_number: " << welderSetting.program_number << endl;
    cout << "dry_extension: " << welderSetting.dry_extension << endl;
  };

  auto welderSetting = arcWeld().getWelderSetting(ec);// 获取当前焊机设置,部分参数如果该焊机不涉及可以忽略
  cout << "ec: " << ec.value() << ", " << ec.message() << endl;
  printWelderSetting(welderSetting);

  welderSetting.protocol = "ethercat";
  welderSetting.mfr = "aotai";
  welderSetting.model = "RL/RPL";
  welderSetting.current_type = 500;
  welderSetting.current_file = "current2";
  welderSetting.voltage_file = "voltage2";
  welderSetting.wire_diameter = 0.8;
  welderSetting.shielding_gas = "CO2";
  welderSetting.program_number = 10;
  welderSetting.dry_extension = 10;
  arcWeld().setWelder(welderSetting, ec);// 设置焊机(方式一),部分参数如果该焊机不涉及可以忽略
  cout << "ec: " << ec.value() << ", " << ec.message() << endl;

  welderSetting = arcWeld().getWelderSetting(ec);// 验证设置是否成功
  cout << "ec: " << ec.value() << ", " << ec.message() << endl;
  printWelderSetting(welderSetting);

  arcWeld().setWelder("ethercat", "aotai", "RL/RPL", 500, ec);// 设置焊机(方式二)
  cout << "ec: " << ec.value() << ", " << ec.message() << endl;

  arcWeld().connectToWelder(ec);// 启用和连接焊机
  cout << "ec: " << ec.value() << ", " << ec.message() << endl;

  arcWeld().disconnectFromWelder(ec);// 断开和禁用焊机
  cout << "ec: " << ec.value() << ", " << ec.message() << endl;
}
// 读取和设置是否连接物理焊机(切换ENI文件)
void setEniHaveWeld(){
  cout << "enter setEniHaveWeld" << endl;
  error_code ec;
  auto ret = arcWeld().isEniHaveWeld(ec);
  cout << "ec: " << ec.value() << ", " << ec.message() << endl;
  cout << "isEniHaveWeld: " << ret << endl;

  arcWeld().setIsEniHaveWeld(true, ec);
  cout << "ec: " << ec.value() << ", " << ec.message() << endl;

  ret = arcWeld().isEniHaveWeld(ec);
  cout << "ec: " << ec.value() << ", " << ec.message() << endl;
  cout << "isEniHaveWeld: " << ret << endl;

  arcWeld().setIsEniHaveWeld(false, ec);
  cout << "ec: " << ec.value() << ", " << ec.message() << endl;

  ret = arcWeld().isEniHaveWeld(ec);
  cout << "ec: " << ec.value() << ", " << ec.message() << endl;
  cout << "isEniHaveWeld: " << ret << endl;
}
Common APIs and Types
getWelderStatus, getWelderSetting, setWelder, WelderSetting, connectToWelder, disconnectFromWelder, isEniHaveWeld, setIsEniHaveWeld, setIOSetting, getIOSetting, IOSetting, IOData, setCurrentCharacteristicCurveData, setVoltageCharacteristicCurveData, getCurrentCharacteristicCurveData, getVoltageCharacteristicCurveData, calculateCurrentCurve, calculateVoltageCurve
Notes
When changing welder parameters, if arc welding is already connected and you need to switch welders, disconnect the welder first, then change parameters.
Scenario 2: Welding Runtime Parameters
Applicable Scenarios You need to adjust globally dry-run Cartesian speed, manual wire feed / retract speed, gas detection time, and other welding-related runtime options in one place (distinct from single arc-on / arc weld named data).
Objective ArcWeldRunningParam is written to the controller; dry run, wire feed/retract, and parameterless gas detection behavior match site conventions.
Recommended Steps
- Build
ArcWeldRunningParam: settest_run_speed(mm/s),wire_feed_speed(m/min),gas_detect_time(s), etc. within the process-package limits (field meanings and ranges: Appendix: Data Structures, “Runtime parametersArcWeldRunningParam”). - Call
setRunningParamto download; usegetRunningParamto read back and verify. - The parameterless
detectGas()overload uses a gas-check duration tied togas_detect_timein the runtime parameters; overloads with time and enable follow the arguments passed at call time (see API Description).
Sample Code
// 读写运行参数
void setRunningParam()
{
  cout << "enter setRunningParam" << endl;
  error_code ec;
  ArcWelding::ArcWeldRunningParam runningParam{100, 2, 10};

  arcWeld().setRunningParam(runningParam, ec);
  cout << "ec: " << ec.value() << ", " << ec.message() << endl;

  auto data = arcWeld().getRunningParam(ec);
  cout << "ec: " << ec.value() << ", " << ec.message() << endl;

  cout << "test_run_speed: " << data.test_run_speed << endl;
  cout << "wire_feed_speed: " << data.wire_feed_speed << endl;
  cout << "gas_detect_time: " << data.gas_detect_time << endl;
}
Common APIs and Types
setRunningParam, getRunningParam, ArcWeldRunningParam, detectGas
Notes
Manual wire feed/retract speed depends on whether the welder supports that function.
Scenario 3: Anti-Collision (Torch Collision Detection)
Applicable Scenarios The site uses a torch collision / anti-collision DI; the program must configure the signal name, enable, block, and countdown, and the host or logic must subscribe to anti-collision state.
Objective Anti-collision parameters are downloaded; signal, enable, block, countdown, etc. can be read via query or event callback and match the HMI or interlocks.
Recommended Steps
- Choose the DI signal name used for anti-collision (e.g.
"DI0_0"). - Call
setAnticollision(signal, enable, block, countdown):enableturns the feature on/off,blockis the block/mute switch,countdownis the countdown (second-level semantics per process package). - For HMI or logic linkage, use
getAnticollisionStatefor a snapshot, or registersetEventWatcher(Event::anticollisionState, callback, ec)and parseEventInfoKey::AnticollisionStatein the callback (seeAnticollisionStatein Appendix: Data Structures).
Sample Code
void printAnticollisionState(const EventInfo& info) {
  using namespace rokae::EventInfoKey::AnticollisionState;
  cout << "anticollision: \n"
        << "signale: " << std::any_cast<std::string>(info.at(Signal))
        << "\nenable: " << std::any_cast<bool>(info.at(Enable))
        << "\nblock: " << std::any_cast<bool>(info.at(Block))
        << "\ncountdown: " << std::any_cast<int>(info.at(Countdown)) << std::endl;
}
void SetAnticollision() {
  error_code ec;
  robot.setEventWatcher(Event::anticollisionState, printAnticollisionState, ec);
  if (ec)
      cout << "setEventWatcher" << ec.message() << std::endl;

  arcWeld().setAnticollision("DI0_0", true, false, 30, ec);
  if (ec)
      cout << "setAnticollision" << ec.message() << std::endl;

  auto ret = arcWeld().getAnticollisionState(ec);
  if (ec)
      cout << "getAnticollisionState" << ec.message() << std::endl;
  cout << "anticollision: \n"
       << "signale: " << ret.signal << "\nenable: " << ret.enable << "\nblock: " << ret.block << "\ncountdown: " << ret.countdown << std::endl;
}
Common APIs and Types
setAnticollision, getAnticollisionState, Event::anticollisionState, EventInfoKey::AnticollisionState, setEventWatcher
Notes
The bound DI signal must not be used by other system functions.
Scenario 4: Maintain Named Process Data in Application
Applicable Scenarios You want the host or an offline tool to download or edit arc-on, arc weld, arc-off, weave, and stitch (segmented) named process data, or to keep parameter names aligned with the teach pendant HMI.
Objective The controller holds a set of referenceable parameter names for later use by ArcOnCommand and other commands or teach programs.
Recommended Steps
- Build the corresponding structs (e.g.
ArcOnData,ArcData,ArcOffData,WeaveData,SegData), setnameand process fields. - Call
setXxxDatato write; usegetXxxData(name, ec)to read back and verify. - Remove one entry with
removeXxxData(name); use the overload that takes a name list for batch removal. - For existing pendant names:
get, change fields, thensetto overwrite or fine-tune.
Sample Code
The snippets below cover setArcOnData (arc on), setArcData (weld), setArcOffData (arc off), setWeaveData (weave), and setSegData (stitch weld). The printArcOnData / printArcData / printArcOffData / printWeaveData helpers are defined earlier in the same file (around lines 63–147) and must live in the same translation unit as these functions.
// 读写起弧参数arcondata
void setArcOnData()
{
  cout << "enter setArcOnData" << endl;
  error_code ec;
  // 默认参数
  ArcWelding::ArcOnData arcOnData;
  arcWeld().setArcOnData(arcOnData, ec);
  cout << "ec: " << ec.value() << ", " << ec.message() << endl;

  auto data = arcWeld().getArcOnData("default", ec);
  cout << "ec: " << ec.value() << ", " << ec.message() << endl;
  cout << "default" << endl;
  printArcOnData(data);

  data = arcWeld().getArcOnData("aaa", ec); // 如果获取不存在的参数,提示-272
  cout << "ec: " << ec.value() << ", " << ec.message() << endl;

  // 自定义参数
  ArcWelding::ArcOnData arcOnData2 = {
    "example_arcondata", "example_annotation", "low_spatter", "wire_feed", "unified", 100, 2, 0, 300, 4000, 500, 600, 0, 2, 300, 100, {true, 10, 100, 200, 15, 5}, // re_arcon
    {true, 50, 100, 20}  // scaratch_arcon
  };
  arcWeld().setArcOnData(arcOnData2, ec);
  cout << "ec: " << ec.value() << ", " << ec.message() << endl;

  data = arcWeld().getArcOnData(arcOnData2.name, ec);
  cout << "ec: " << ec.value() << ", " << ec.message() << endl;
  cout << "example_arcondata" << endl;
  printArcOnData(data);

  // 删除参数
  arcWeld().removeArcOnData("default",ec);
  data = arcWeld().getArcOnData("default", ec);
  cout << "ec: " << ec.value() << ", " << ec.message() << endl; // -272

  // 批量删除
  arcOnData.name = "remove1";
  arcWeld().setArcOnData(arcOnData, ec);
  arcOnData.name = "remove2";
  arcWeld().setArcOnData(arcOnData, ec);
  arcWeld().removeArcOnData(std::vector<std::string>({"remove1", "remove2"}), ec);
  data = arcWeld().getArcOnData("remove1", ec);
  cout << "ec: " << ec.value() << ", " << ec.message() << endl; // -272
  data = arcWeld().getArcOnData("remove2", ec);
  cout << "ec: " << ec.value() << ", " << ec.message() << endl; // -272

  // 可以对hmi工艺包的参数进行修改
  data = arcWeld().getArcOnData("arcondata1", ec);
  cout << "ec: " << ec.value() << ", " << ec.message() << endl;
  printArcOnData(data);

  arcOnData.name = "arcondata1";
  arcWeld().setArcOnData(arcOnData, ec);
  data = arcWeld().getArcOnData("arcondata1", ec);
  cout << "ec: " << ec.value() << ", " << ec.message() << endl;
  printArcOnData(data);

  arcWeld().removeArcOnData("arcondata1",ec);
  data = arcWeld().getArcOnData("arcondata1", ec);
  cout << "ec: " << ec.value() << ", " << ec.message() << endl; // -272
}
// 读写焊接参数arcdata
void setArcData()
{
  cout << "enter setArcData" << endl;
  error_code ec;
  // 默认参数
  ArcWelding::ArcData arcData;
  arcWeld().setArcData(arcData, ec);
  cout << "ec: " << ec.value() << ", " << ec.message() << endl;

  auto data = arcWeld().getArcData(arcData.name, ec);
  cout << "ec: " << ec.value() << ", " << ec.message() << endl;
  cout << "default" << endl;
  printArcData(data);

  // 自定义参数
  ArcWelding::ArcData arcData2 = {
    "example_arcdata", "example_annotation", "low_spatter", "wire_feed", "unified", 100, 20, 0, 30, 400, {500, "auto_arc_reignition", 15}};
  arcWeld().setArcData(arcData2, ec);
  cout << "ec: " << ec.value() << ", " << ec.message() << endl;

  data = arcWeld().getArcData(arcData2.name, ec);
  cout << "ec: " << ec.value() << ", " << ec.message() << endl;
  cout << "example_arcdata" << endl;
  printArcData(data);

  // 删除参数
  arcWeld().removeArcData("default", ec);
  data = arcWeld().getArcData("default", ec);
  cout << "ec: " << ec.value() << ", " << ec.message() << endl; // -272

  // 批量删除
  arcData.name = "remove1";
  arcWeld().setArcData(arcData, ec);
  arcData.name = "remove2";
  arcWeld().setArcData(arcData, ec);
  arcWeld().removeArcData(std::vector<std::string>({"remove1", "remove2"}), ec);
  data = arcWeld().getArcData("remove1", ec);
  cout << "ec: " << ec.value() << ", " << ec.message() << endl; // -272
  data = arcWeld().getArcData("remove2", ec);
  cout << "ec: " << ec.value() << ", " << ec.message() << endl; // -272

  // 可以对hmi工艺包的参数进行修改
  data = arcWeld().getArcData("arcdata1", ec);
  cout << "ec: " << ec.value() << ", " << ec.message() << endl;
  printArcData(data);

  arcData.name = "arcdata1";
  arcWeld().setArcData(arcData, ec);
  data = arcWeld().getArcData("arcdata1", ec);
  cout << "ec: " << ec.value() << ", " << ec.message() << endl;
  printArcData(data);

  arcWeld().removeArcData("arcdata1", ec);
  data = arcWeld().getArcData("arcdata1", ec);
  cout << "ec: " << ec.value() << ", " << ec.message() << endl; // -272
}
// 读写收弧参数arcoffdata
void setArcOffData()
{
  cout << "enter setArcOffData" << endl;
  error_code ec;
  // 默认参数
  ArcWelding::ArcOffData arcOffData;
  arcWeld().setArcOffData(arcOffData, ec);
  cout << "ec: " << ec.value() << ", " << ec.message() << endl;

  auto data = arcWeld().getArcOffData("default", ec);
  cout << "ec: " << ec.value() << ", " << ec.message() << endl;
  cout << "default" << endl;
  printArcOffData(data);

  // 自定义参数
  ArcWelding::ArcOffData arcOffData2 = {
    "example_arcoffdata", "example_annotation", "low_spatter", "wire_feed", "unified", 100, 20, 0, 300, 400, 5500, 600, 700, {true, 20, 15, 100}};
  arcWeld().setArcOffData(arcOffData2, ec);
  cout << "ec: " << ec.value() << ", " << ec.message() << endl;

  data = arcWeld().getArcOffData(arcOffData2.name, ec);
  cout << "ec: " << ec.value() << ", " << ec.message() << endl;
  cout << "example_arcoffdata" << endl;
  printArcOffData(data);

  // 删除参数
  arcWeld().removeArcOffData("default", ec);
  data = arcWeld().getArcOffData("default", ec);
  cout << "ec: " << ec.value() << ", " << ec.message() << endl; // -272

  // 批量删除
  arcOffData.name = "remove1";
  arcWeld().setArcOffData(arcOffData, ec);
  arcOffData.name = "remove2";
  arcWeld().setArcOffData(arcOffData, ec);
  arcWeld().removeArcOffData(std::vector<std::string>({"remove1", "remove2"}), ec);
  data = arcWeld().getArcOffData("remove1", ec);
  cout << "ec: " << ec.value() << ", " << ec.message() << endl; // -272
  data = arcWeld().getArcOffData("remove2", ec);
  cout << "ec: " << ec.value() << ", " << ec.message() << endl; // -272

  // 可以对hmi工艺包的参数进行修改
  data = arcWeld().getArcOffData("arcoffdata1", ec);
  cout << "ec: " << ec.value() << ", " << ec.message() << endl;
  printArcOffData(data);

  arcOffData.name = "arcoffdata1";
  arcWeld().setArcOffData(arcOffData, ec);
  data = arcWeld().getArcOffData("arcoffdata1", ec);
  cout << "ec: " << ec.value() << ", " << ec.message() << endl;
  printArcOffData(data);

  arcWeld().removeArcOffData("arcoffdata1", ec);
  data = arcWeld().getArcOffData("arcoffdata1", ec);
  cout << "ec: " << ec.value() << ", " << ec.message() << endl; // -272
}
// 读写摆动参数
void setWeaveData()
{
  cout << "enter setWeaveData" << endl;
  error_code ec;
  // 默认参数
  ArcWelding::WeaveData weaveData;
  arcWeld().setWeaveData(weaveData, ec);
  cout << "ec: " << ec.value() << ", " << ec.message() << endl;

  auto data = arcWeld().getWeaveData("default", ec);
  cout << "ec: " << ec.value() << ", " << ec.message() << endl;
  cout << "default" << endl;
  printWeaveData(data);

  // 自定义参数
  ArcWelding::WeaveData weaveData2 = {
    "example_weavedata", "example_annotation", "cycle", "sine", 1, {2, 2}, "weave_stop", {10, 0, 20}, 5, true, "v_pattern", {0, 0}, 0, 1, 10};
  arcWeld().setWeaveData(weaveData2, ec);
  cout << "ec: " << ec.value() << ", " << ec.message() << endl;

  data = arcWeld().getWeaveData(weaveData2.name, ec);
  cout << "ec: " << ec.value() << ", " << ec.message() << endl;

  cout << "example_weavedata" << endl;
  printWeaveData(data);

  // 删除参数
  arcWeld().removeWeaveData("default", ec);
  data = arcWeld().getWeaveData("default", ec);
  cout << "ec: " << ec.value() << ", " << ec.message() << endl; // -272

  // 批量删除
  weaveData.name = "remove1";
  arcWeld().setWeaveData(weaveData, ec);
  weaveData.name = "remove2";
  arcWeld().setWeaveData(weaveData, ec);
  arcWeld().removeWeaveData(std::vector<std::string>({"remove1", "remove2"}), ec);
  data = arcWeld().getWeaveData("remove1", ec);
  cout << "ec: " << ec.value() << ", " << ec.message() << endl; // -272
  data = arcWeld().getWeaveData("remove2", ec);
  cout << "ec: " << ec.value() << ", " << ec.message() << endl; // -272

  // 可以对hmi工艺包的参数进行修改
  data = arcWeld().getWeaveData("weavedata1", ec);
  cout << "ec: " << ec.value() << ", " << ec.message() << endl;
  printWeaveData(data);

  weaveData.name = "weavedata1";
  arcWeld().setWeaveData(weaveData, ec);
  data = arcWeld().getWeaveData("weavedata1", ec);
  cout << "ec: " << ec.value() << ", " << ec.message() << endl;
  printWeaveData(data);

  arcWeld().removeWeaveData("weavedata1", ec);
  data = arcWeld().getWeaveData("weavedata1", ec);
  cout << "ec: " << ec.value() << ", " << ec.message() << endl; // -272
}
// 读写间断焊参数
void setSegData(){
  cout << "enter setSegData" << endl;
  error_code ec;
  ArcWelding::SegData segdata{"segdata1","segannotation","normal","v10",10,20};
  arcWeld().setSegData(segdata, ec);
  cout << "ec: " << ec.value() << ", " << ec.message() << endl;

  auto data = arcWeld().getSegData("segdata1", ec);
  cout << "ec: " << ec.value() << ", " << ec.message() << endl;
  cout << "name: " << data.name << "\n"
       << "annotation: " << data.annotation << "\n"
       << "seg_type: " << data.seg_type << "\n"
       << "non_welded_speed: " << data.non_welded_speed << "\n"
       << "welded_distance: " << data.welded_distance << "\n"
       << "non_welded_distance: " << data.non_welded_distance << endl;

  // 删除参数
  arcWeld().removeSegData("segdata1", ec);
  data = arcWeld().getSegData("segdata1", ec);
  cout << "ec: " << ec.value() << ", " << ec.message() << endl; // -272

  // 批量删除
  segdata.name = "segdata2";
  arcWeld().setSegData(segdata, ec);
  segdata.name = "segdata3";
  arcWeld().setSegData(segdata, ec);
  arcWeld().removeSegData(std::vector<std::string>({"segdata2","segdata3"}), ec);
  data = arcWeld().getSegData("segdata2", ec);
  cout << "ec: " << ec.value() << ", " << ec.message() << endl; // -272
}
Common APIs and Types
Named process-data APIs grouped by set / get / remove (signatures and overloads: API Description, Appendix: Methods).
-
Arc on / arc weld / arc off / weave / stitch
setArcOnData/getArcOnData/removeArcOnDatasetArcData/getArcData/removeArcData,enableArcData
setArcOffData/getArcOffData/removeArcOffData
setWeaveData/getWeaveData/removeWeaveData
setSegData/getSegData/removeSegData
setWeaveAdaptiveData/getWeaveAdaptiveData -
Multi-pass / multi-layer
setLayerData/getLayerData/removeLayerData
setLayerCout,MpmlPathCheck,GetLayerStartPoint -
Laser track / laser search (named parameters)
setLaserTrackData/getLaserTrackData/removeLaserTrackData
setLaserSearchData/getLaserSearchData/removeLaserSearchData -
Arc tracking (named parameters)
setArcTrackParam/getArcTrackParam/removeArcTrackParam -
Current / voltage characteristic curves (named curve data)
setCurrentCharacteristicCurveData/getCurrentCharacteristicCurveData
setVoltageCharacteristicCurveData/getVoltageCharacteristicCurveData
calculateCurrentCurve,calculateVoltageCurve(compute only; not persisted)
Notes
When reading by name and the parameter does not exist, the controller may return a defined error code (e.g. -272); handle this in application logic.
Scenario 5: Welding Mode Selection and Manual / Auto Behavior
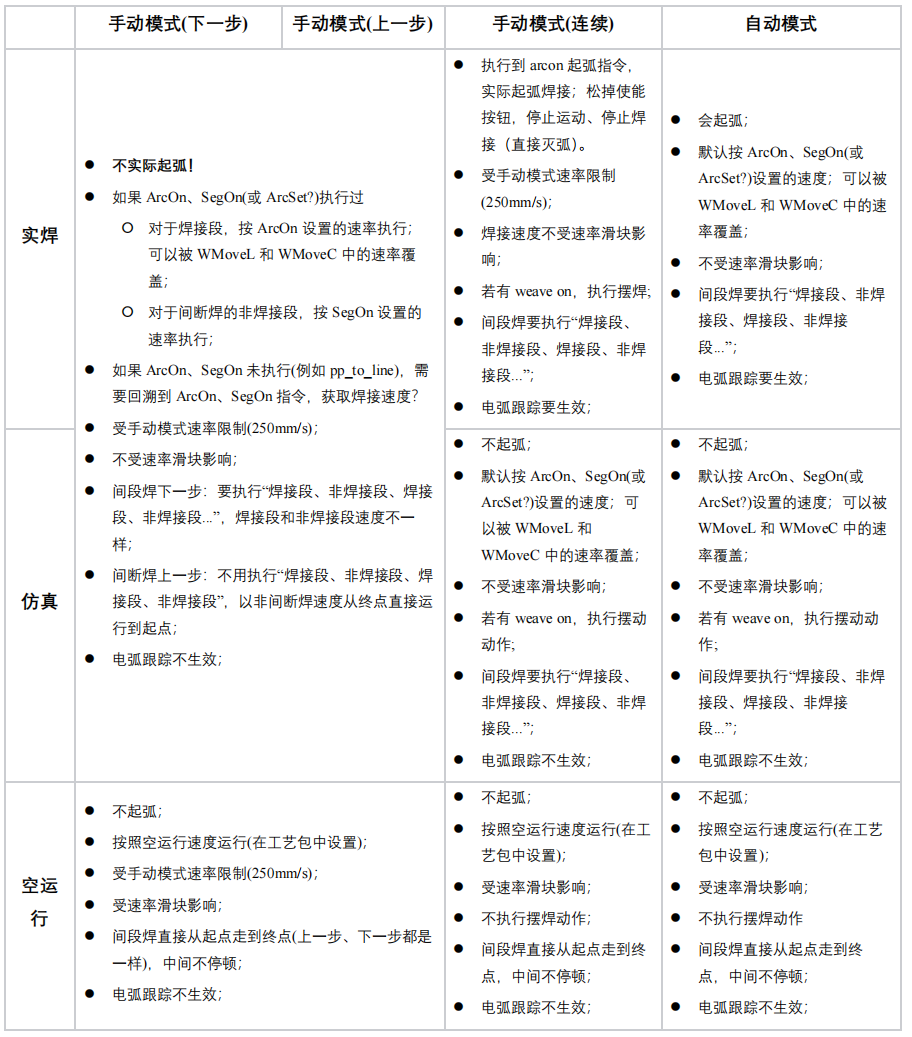
Applicable Scenarios You need dry run to verify the path, simulation to verify cycle and weave, or real welding with arc, and you need to understand differences under teach pendant manual step, manual continuous, and automatic (arc or not, speed slider, stitch, weave, arc tracking, etc.).
Objective The active weld mode matches the line phase (commissioning → simulation → production).
Recommended Steps
- Call
setWeldModeto switch amongWeldMode::TestRun(dry run),Simu(simulation), andReal(live welding). - Confirm with
getWeldMode. - Together with how the teach pendant is run on site, use the table below for expected behavior (aligned with the process package).
Sample Code
// 读写焊接模式
void setWeldMode()
{
  cout << "enter setWeldMode" << endl;
  error_code ec;
  // 切换为空运行模式
  arcWeld().setWeldMode(ArcWelding::WeldMode::TestRun, ec);
  cout << "ec: " << ec.value() << ", " << ec.message() << endl;
  auto mode = arcWeld().getWeldMode(ec); // 读取当前模式
  cout << "mode: " << mode << endl;
  cout << "ec: " << ec.value() << ", " << ec.message() << endl;

  // 切换为仿真模式
  arcWeld().setWeldMode(ArcWelding::WeldMode::Simu, ec);
  cout << "ec: " << ec.value() << ", " << ec.message() << endl;
  mode = arcWeld().getWeldMode(ec);
  cout << "mode: " << mode << endl;
  cout << "ec: " << ec.value() << ", " << ec.message() << endl;

  // 切换为实焊模式
  arcWeld().setWeldMode(ArcWelding::WeldMode::Real, ec);
  cout << "ec: " << ec.value() << ", " << ec.message() << endl;
  mode = arcWeld().getWeldMode(ec);
  cout << "mode: " << mode << endl;
  cout << "ec: " << ec.value() << ", " << ec.message() << endl;
}
Welding Mode vs. Run Mode (Illustration)
Common APIs and Types
setWeldMode, getWeldMode, ArcWelding::WeldMode
Notes
Scenario 6: Typical Seam — Arc On → Linear/Arc Weld → Arc Off
Applicable Scenarios The most common straight or arc seam: under non-real-time command mode, enqueue ordinary motions and arc-welding commands in order into one queue and start it.
Objective The robot runs in order: approach (optional) → arc-on and weld parameters apply → weld path with or without weave → arc-off.
Recommended Steps
- Enable the welder first (Scenario 1).
setMotionControlMode(NrtCommand, ec).- Ensure the welder is configured and
connectToWelder(as in Scenario 1). - Build
ArcOnCommandand bind the downloaded arc-on and arc weld parameter names (e.g. same names as on the teach pendant). - Build weld segments:
WMoveLCommand/WMoveCCommand, etc. - Build
ArcOffCommandand bind the arc-off parameter name. - Call
moveAppendmultiple times with the same queue id in order; after power-on,moveStartruns the queue. - For pause / resume, use
stopandmoveStartagain (see motion control documentation).
Sample Code
// 指令示例
void exampleCommand()
{
  cout << "enter exampleCommand" << endl;
  error_code ec;

  ArcWelding::ArcOnCommand arcon;
  arcon.setArcOnData("default", ec);
  cout << "ec: " << ec.value() << ", " << ec.message() << endl;

  arcon.setArcData("default", ec);
  cout << "ec: " << ec.value() << ", " << ec.message() << endl;

  ArcWelding::ArcOffCommand arcoff;
  arcoff.setArcOffData("default", ec);
  cout << "ec: " << ec.value() << ", " << ec.message() << endl;

  ArcWelding::WMoveLCommand wml({0.556769, -0.15, 0.4872, -M_PI, 0, M_PI}, 10, 1); // 直线摆动
  cout << "ec: " << ec.value() << ", " << ec.message() << endl;

  MoveLCommand ml({0.556769, -0.15, 0.4872, -M_PI, 0, M_PI}, 10, 1); // 直线

  ArcWelding::WMoveCCommand wmc({0.786, 0, 0.431, 3, 0.98, 3}, {0.786, 0, 0.431, 3, 0.98, 3}, 10, 1); // 圆弧摆动

  robot.setMotionControlMode(MotionControlMode::NrtCommand, ec);
  string id;

  robot.moveAppend(arcon, id, ec);
  cout << "ec: " << ec.value() << ", " << ec.message() << endl;

  robot.moveAppend(wml, id, ec);
  cout << "ec: " << ec.value() << ", " << ec.message() << endl;

  robot.moveAppend(arcoff, id, ec);
  cout << "ec: " << ec.value() << ", " << ec.message() << endl;

  robot.setPowerState(true,ec);

  robot.moveStart(ec);
  cout << "ec: " << ec.value() << ", " << ec.message() << endl;

  std::this_thread::sleep_for(std::chrono::seconds(1));
  robot.stop(ec); // 暂停
  cout << "ec: " << ec.value() << ", " << ec.message() << endl;

  robot.moveStart(ec);// 继续
  cout << "ec: " << ec.value() << ", " << ec.message() << endl;
}
Common APIs and Types
ArcOnCommand, ArcOffCommand, WMoveLCommand, WMoveCCommand, moveAppend, moveStart, MoveLCommand
Notes
Waypoints, speed, and Conf must suit this robot model.
moveStart() is non-blocking; avoid exiting the program immediately.
You must use ordinary MoveCommand moves before arcon and arcoff; between them you must use WMoveCommand.
When calling moveAppend(arcon, id, ec), ensure the controller has already stored the arc-on and arc weld parameters referenced by arcon; do not call setArcOnData on the line just above or adjacent to this call to save data, or controller latency may cause errors.
For fly arc start (pre-arc time in ArcOnData non-zero), add a MoveLCommand before arcon.
Scenario 7: Change Process Parameters During Welding with arc_set_opt (ArcSet)
Applicable Scenarios On a seam after arc start, you want one straight or arc segment to switch to another arcdata set without extinguishing the arc or splitting the program.
Objective On queued WMoveLCommand / WMoveCCommand weld moves, use arc_set_opt to specify the weld parameter name to switch to.
Recommended Steps
- Use
setArcDataahead of time to maintain multiple named process sets (e.g.arcdata1,arcdata2). - For straight segments use
WMoveLCommand; for arc segments useWMoveCCommand, and setarc_set_opton the command object.
Sample Code
/**
 * @brief 示例 - 焊接过程中设置焊接参数。点位适用机型XMS5
 */
void arcSetExample() {
  std::string cmd_id;
  error_code ec;
  ArcWelding::ArcOnCommand arc_on_command("arcondata1", "arcdata1");
  ArcWelding::ArcOffCommand arc_off_command("arcoffdata1");
  MoveAbsJCommand absj {{0, M_PI / 6, -M_PI_2, 0, -M_PI / 3, 0}, 1000};
  MoveLCommand l {{0.614, 0.136, 0.389, -M_PI, 0, M_PI }, 500};
  ArcWelding::WMoveLCommand wmovel1 {{0.553, -0.107, 0.309, -M_PI, 0, M_PI}, 20};
  ArcWelding::WMoveLCommand wmovel2 {{0.553, 0.107, 0.309, -M_PI, 0, M_PI}, 20};
  wmovel2.arc_set_opt = { "arcdata2", true, 80 };

  robot.setPowerState(true, ec);

  robot.moveAppend(absj, cmd_id, ec);
  robot.moveAppend(l, cmd_id, ec);
  robot.moveAppend(arc_on_command, cmd_id, ec);
  robot.moveAppend({wmovel1, wmovel2}, cmd_id, ec);
  robot.moveAppend(arc_off_command, cmd_id, ec);
  robot.moveStart(ec);
  while(getchar() != '\n');

  robot.setPowerState(false, ec);
}
Common APIs and Types
WMoveLCommand::arc_set_opt, WMoveCCommand::arc_set_opt, setArcData
Scenario 8: Linear / Arc Weaving Welding
Applicable Scenarios Fillet or vertical-corner seams need weave overlaid on a straight or arc segment; the process package resolves amplitude and frequency from the weave data name.
Objective Weave data is downloaded and bound to weld motions; use WeaveOnCommand / WeaveOffCommand to span multiple segments.
Recommended Steps
- Use
setWeaveDatato store the weave process name (e.g.weavedata1). - Create
WeaveOnCommandandWeaveOffCommand. - Straight: build
WMoveLCommand, then callsetWeaveData("…", ec), or use a constructor overload that takes the weave index (per SDK). - Arc: build
WMoveCCommandand callsetWeaveDatasimilarly; auxiliary point, target, and speed must meet robot and process-package limits. - Typical sequence:
ArcOnCommand→WeaveOnCommand→ one or moreWMoveL/WMoveC→WeaveOffCommand→ArcOffCommand.
Sample Code
void weaveOnExample() {
  error_code ec;

  ArcWelding::ArcOnCommand arcon;
  arcon.setArcOnData("default", ec);
  cout << "ec: " << ec.value() << ", " << ec.message() << endl;

  arcon.setArcData("default", ec);
  cout << "ec: " << ec.value() << ", " << ec.message() << endl;

  ArcWelding::ArcOffCommand arcoff;
  arcoff.setArcOffData("default", ec);
  cout << "ec: " << ec.value() << ", " << ec.message() << endl;

  ArcWelding::WMoveLCommand wml({0.556769, -0.15, 0.4872, -M_PI, 0, M_PI}, 10, 1); // 直线摆动
  wml.setWeaveData("default", ec);
  cout << "ec: " << ec.value() << ", " << ec.message() << endl;
  cout << "wml: " << wml.getWeaveData() << endl;

  ArcWelding::WeaveOnCommand weaveon;
  weaveon.setWeaveData("aaa", ec);

  ArcWelding::WeaveOffCommand weaveoff;

  robot.setMotionControlMode(MotionControlMode::NrtCommand, ec);
  string id;

  robot.moveAppend(arcon, id, ec);
  cout << "ec: " << ec.value() << ", " << ec.message() << endl;

  robot.moveAppend(weaveon, id, ec);
  cout << "ec: " << ec.value() << ", " << ec.message() << endl;

  robot.moveAppend(wml, id, ec);
  cout << "ec: " << ec.value() << ", " << ec.message() << endl;

  robot.moveAppend(weaveoff, id, ec);
  cout << "ec: " << ec.value() << ", " << ec.message() << endl;

  robot.moveAppend(arcoff, id, ec);
  cout << "ec: " << ec.value() << ", " << ec.message() << endl;

  robot.setPowerState(true,ec);

  robot.moveStart(ec);
  cout << "ec: " << ec.value() << ", " << ec.message() << endl;

  std::this_thread::sleep_for(std::chrono::seconds(1));
  robot.stop(ec); // 暂停
  cout << "ec: " << ec.value() << ", " << ec.message() << endl;

  robot.moveStart(ec);// 继续
  cout << "ec: " << ec.value() << ", " << ec.message() << endl;
}
Common APIs and Types
setWeaveData, WMoveLCommand, WMoveCCommand, WeaveOnCommand, WeaveOffCommand
Notes
- Motions that must weave must lie between
WeaveOnCommandandWeaveOffCommand; setting weave parameters only onWMoveLCommand/WMoveCCommandalone has no effect. - Segments between
WeaveOnCommandandWeaveOffCommandthat omit weave parameters still run using the weave parameters fromWeaveOnCommandby default.
Scenario 9: Linear / Arc Segmented Welding
Applicable Scenarios Only part of the path needs a “weld—pause—weld” rhythm; weave is not required, or weave is handled on other segments separately.
Objective Between SegOnCommand and SegOffCommand, WMoveL / WMoveC follow the intermittent rhythm in SegData; outside that window the weld is continuous or ordinary weld motion.
Recommended Steps
- Use
setSegDatato store the stitch (intermittent) weld parameter name (e.g.segdata1). - Queue:
ArcOnCommand→ (optional dry moves or non-stitch segments) →SegOnCommand("segdata1")→ one or more straight/arc weld moves →SegOffCommand→ further continuous weld or arc-off.
Sample Code
// 间断焊。适用CR机型,SR机型需要调整偏移量
void segOnExample(){
  error_code ec;

  // 根据起始轴角度,计算笛卡尔位姿
  auto model = robot.model();
  std::array<double, 6> drag_posture = {0, M_PI / 6, -M_PI_2, 0, -M_PI / 3, 0};
  auto p_start = model.calcFk(drag_posture, ec);
  print(std::cout, "start pose: ", p_start);

  // 设置间断焊参数
  ArcWelding::SegData segdata {"segdata1", "segannotation", "normal","v5",15,30};
  arcWeld().setSegData(segdata, ec);
  // 开始间断焊指令,设置间断焊参数为segdata1
  ArcWelding::SegOnCommand segOnCmd("segdata1");
  ArcWelding::SegOffCommand segOffCmd;
  // 几条焊接运动指令
  ArcWelding::WMoveLCommand non_seg_wmovel0(p_start, 20, 0);
  non_seg_wmovel0.offset.type = CartesianPosition::Offset::Type::offs;
  non_seg_wmovel0.offset.frame.trans = {0.01, 0.03, -0.02};
  ArcWelding::WMoveLCommand seg_wmovel0(p_start, 20, 0);
  seg_wmovel0.offset.type = CartesianPosition::Offset::Type::offs;
  seg_wmovel0.offset.frame.trans = {0, -0.01, -0.02};
  seg_wmovel0.arc_set_opt = { "arcdata2", true, 0 };
  ArcWelding::WMoveLCommand seg_wmovel1(p_start, 20, 0);
  seg_wmovel1.offset.type = CartesianPosition::Offset::Type::offs;
  seg_wmovel1.offset.frame.trans = {0, 0.08, -0.02};
  seg_wmovel1.arc_set_opt = { "arcdata3", true, 0 };
  ArcWelding::WMoveCCommand seg_wmc(p_start, p_start, 10, 0);
  seg_wmc.targetOffset.type = CartesianPosition::Offset::Type::offs;
  seg_wmc.targetOffset.frame.trans = {0, -0.05, 0.01};
  seg_wmc.auxOffset.type = CartesianPosition::Offset::Type::offs;
  seg_wmc.auxOffset.frame.trans = {0, 0.070, 0};

  ArcWelding::WMoveLCommand non_seg_wmovel1(p_start, 20, 1);
  non_seg_wmovel1.offset.type = CartesianPosition::Offset::Type::offs;
  non_seg_wmovel1.offset.frame.trans = {-0.05, 0, 0};
  non_seg_wmovel1.arc_set_opt = { "arcdata1", true, 0 };

  ArcWelding::ArcOnCommand arcOnCmd("arcondata1", "arcdata1");
  ArcWelding::ArcOffCommand arcOffCmd("arcoffdata1");
  MoveAbsJCommand absj {{0, M_PI / 6, -M_PI_2, 0, -M_PI / 3, 0}, 500};

  string id;

  robot.setPowerState(true, ec);
  robot.moveAppend(absj, id, ec);
  robot.moveAppend(arcOnCmd, id, ec);
  robot.moveAppend({non_seg_wmovel0}, id, ec);
  robot.moveAppend(segOnCmd, id, ec);
  robot.moveAppend({seg_wmovel0, seg_wmovel1}, id, ec);
  robot.moveAppend(seg_wmc, id, ec);
  robot.moveAppend(segOffCmd, id, ec);
  robot.moveAppend(non_seg_wmovel1, id, ec);
  robot.moveAppend(arcOffCmd, id, ec);
  robot.moveStart(ec);

  while(getchar() != '\n');
}
Common APIs and Types
setSegData, SegOnCommand, SegOffCommand, WMoveLCommand, WMoveCCommand
Scenario 10: Linear / Arc Segmented Welding with Weaving
Applicable Scenarios Intermittent rhythm and weave apply to the same arc interval.
Objective The WeaveOn span and the SegOn–SegOff window are ordered correctly in the queue, and arc_set_opt, offsets, etc. on each WMoveL / WMoveC match field calibration.
Recommended Steps
- Complete both
setWeaveDataandsetSegData. - Typical order (see
segOnExample):ArcOnCommand→WeaveOnCommand→ optional non-stitch transitionWMoveL→SegOnCommand→ multipleWMoveL/WMoveCinside the stitch window →SegOffCommand→ further motion →WeaveOffCommand→ArcOffCommand. - If stitch and continuous segments use different process data, set
arc_set_opton the corresponding commands. - For arc segments, configure target and auxiliary offsets like the sample on the command’s
offset/targetOffsetmembers (see SDK headers).
Sample Code
/**
 * @brief 示例 - 间断焊。适用CR机型,SR机型需要调整偏移量
 */
void segOnExample(){
  error_code ec;

  // 根据起始轴角度,计算笛卡尔位姿
  auto model = robot.model();
  std::array<double, 6> drag_posture = {0, M_PI / 6, -M_PI_2, 0, -M_PI / 3, 0};
  auto p_start = model.calcFk(drag_posture, ec);
  print(std::cout, "start pose: ", p_start);

  // 设置间断焊参数
  ArcWelding::SegData segdata {"segdata1", "segannotation", "normal","v5",15,30};
  arcWeld().setSegData(segdata, ec);
  // 开始间断焊指令,设置间断焊参数为segdata1
  ArcWelding::SegOnCommand segOnCmd("segdata1");
  ArcWelding::SegOffCommand segOffCmd;
  // 几条焊接运动指令
  ArcWelding::WMoveLCommand non_seg_wmovel0(p_start, 20, 0);
  non_seg_wmovel0.offset.type = CartesianPosition::Offset::Type::offs;
  non_seg_wmovel0.offset.frame.trans = {0.01, 0.03, -0.02};
  ArcWelding::WMoveLCommand seg_wmovel0(p_start, 20, 0);
  seg_wmovel0.offset.type = CartesianPosition::Offset::Type::offs;
  seg_wmovel0.offset.frame.trans = {0, -0.01, -0.02};
  seg_wmovel0.arc_set_opt = { "arcdata2", true, 0 };
  ArcWelding::WMoveLCommand seg_wmovel1(p_start, 20, 0);
  seg_wmovel1.offset.type = CartesianPosition::Offset::Type::offs;
  seg_wmovel1.offset.frame.trans = {0, 0.08, -0.02};
  seg_wmovel1.arc_set_opt = { "arcdata3", true, 0 };
  ArcWelding::WMoveCCommand seg_wmc(p_start, p_start, 10, 0);
  seg_wmc.targetOffset.type = CartesianPosition::Offset::Type::offs;
  seg_wmc.targetOffset.frame.trans = {0, -0.05, 0.01};
  seg_wmc.auxOffset.type = CartesianPosition::Offset::Type::offs;
  seg_wmc.auxOffset.frame.trans = {0, 0.070, 0};

  ArcWelding::WMoveLCommand non_seg_wmovel1(p_start, 20, 1);
  non_seg_wmovel1.offset.type = CartesianPosition::Offset::Type::offs;
  non_seg_wmovel1.offset.frame.trans = {-0.05, 0, 0};
  non_seg_wmovel1.arc_set_opt = { "arcdata1", true, 0 };

  ArcWelding::ArcOnCommand arcOnCmd("arcondata1", "arcdata1");
  ArcWelding::ArcOffCommand arcOffCmd("arcoffdata1");
  MoveAbsJCommand absj {{0, M_PI / 6, -M_PI_2, 0, -M_PI / 3, 0}, 500};
  ArcWelding::WeaveOnCommand weave_on_command("weavedata1");
  ArcWelding::WeaveOffCommand weaveOffCmd;

  string id;

  robot.setPowerState(true, ec);
  robot.moveAppend(absj, id, ec);
  robot.moveAppend(arcOnCmd, id, ec);
  robot.moveAppend(weave_on_command, id, ec);
  robot.moveAppend({non_seg_wmovel0}, id, ec);
  robot.moveAppend(segOnCmd, id, ec);
  robot.moveAppend({seg_wmovel0, seg_wmovel1}, id, ec);
  robot.moveAppend(seg_wmc, id, ec);
  robot.moveAppend(segOffCmd, id, ec);
  robot.moveAppend(non_seg_wmovel1, id, ec);
  robot.moveAppend(weaveOffCmd, id, ec);
  robot.moveAppend(arcOffCmd, id, ec);
  robot.moveStart(ec);

  while(getchar() != '\n');
}
Common APIs and Types
Combine the types listed in Scenario 8 and Scenario 9.
Notes
Wrong ordering may prevent weave or stitch from taking effect; always verify in simulation or dry run before live welding.
Scenario 11: Pendulum Path Welding
Applicable Scenarios Seam geometry is defined as a pendulum path (dedicated pendulum motion command).
Objective Correctly set start, auxiliary, target, and speed on WMoveLPendulumCommand; use arc_set_opt on the member when switching process data.
Recommended Steps
- Fill in each point of
WMoveLPendulumCommandper process package and teach data (as inarcSetPendulumExample). - Combine with
ArcOnCommand/ArcOffCommandlike ordinary weld moves: enqueue under non-real-time mode, thenmoveStart. - If the same program also uses ordinary weave, distinguish from Scenario 8: pendulum is a separate motion type; do not usually wrap the same pendulum segment with
WeaveOn(per process package).
Sample Code
/**
 * @brief 示例 - 焊接钟摆过程中设置焊接参数。
 */
void arcSetPendulumExample() {
    std::string cmd_id;
    error_code ec;
    // 设置起弧/收弧
    ArcWelding::ArcData arcData;
    arcData.name = "arcdata1";
    arcWeld().setArcData(arcData, ec);

    arcData.name = "arcdata2";
    arcData.current = 20;
    arcData.voltage = 15;
    arcWeld().setArcData(arcData, ec);

    arcData.name = "arcdata3";
    arcData.current = 100;
    arcData.voltage = 20;
    arcData.weld_speed = 15;
    arcWeld().setArcData(arcData, ec);

    ArcWelding::ArcOnData arconData;
    arconData.name = "arcondata1";
    arcWeld().setArcOnData(arconData, ec);

    ArcWelding::ArcOffData arcOffData;
    arcOffData.name = "arcoffdata1";
    arcWeld().setArcOffData(arcOffData, ec);

    // 设置摆动
    ArcWelding::WeaveData weaveData;
    weaveData.weave_length_frequency = 3.5;
    weaveData.amplitude.left = 6;
    weaveData.amplitude.right = 4.5;
    arcWeld().setWeaveData(weaveData, ec);

    ArcWelding::ArcOnCommand arc_on_command("arcondata1", "arcdata1");
    ArcWelding::ArcOffCommand arc_off_command("arcoffdata1");

    MoveAbsJCommand absj{ {0.168,0.369, -0.883,-0.210,-0.637,-0.137}, 1000 };
    // 使用栈上对象而不是堆上对象,避免内存泄漏
    CartesianPosition start1{ 0.68015, -0.077702, 0.777555, -2.319, 1.112, -2.228 };
    CartesianPosition startAux1{ 0.672849, -0.0777043, 0.777555,   -2.319, 1.112, -2.228 };
    CartesianPosition targetAux1{ 0.647849, -0.0943, 0.750882,   -2.319, 1.112, -2.228 };
    CartesianPosition target1{ 0.647849, -0.09473, 0.747882,   -2.319, 1.112, -2.228 };

    CartesianPosition targetAux2{ 0.437346, -0.2597, 0.793403,   -2.319, 1.112, -2.228 };
    CartesianPosition target2{ 0.435346, -0.2597, 0.796403,   -2.319, 1.112, -2.228 };

    CartesianPosition targetAux3{ 0.6117849, -0.14534, 0.666882,   -2.319, 1.112, -2.228 };
    CartesianPosition target3{ 0.599849, -0.14574, 0.667882,   -2.319, 1.112, -2.228 };

    MoveLCommand l{ start1, 500 };
    // 钟摆
    ArcWelding::WMoveLPendulumCommand wp1{ startAux1, target1, targetAux1, 20, 0.5, 100, 2 };

    ArcWelding::WMoveLPendulumCommand wp2{ NULL, target2, targetAux2, 20, 3, 234, 1 };
    wp2.arc_set_opt = { "arcdata2", true, 0 };

    ArcWelding::WMoveLPendulumCommand wp3{ NULL, target3, targetAux3, USE_DEFAULT, 3.1, 4, 5 };
    wp3.arc_set_opt = { "arcdata3", true, 0 };

    robot.setPowerState(true, ec);
    robot.moveAppend(absj, cmd_id, ec);
    robot.moveAppend(l, cmd_id, ec);
    robot.moveAppend(arc_on_command, cmd_id, ec);
    robot.moveAppend(wp1, cmd_id, ec);
    robot.moveAppend(wp2, cmd_id, ec);
    robot.moveAppend(wp3, cmd_id, ec);
    robot.moveAppend(arc_off_command, cmd_id, ec);
    robot.moveStart(ec);
    while (getchar() != '\n');

    robot.setPowerState(false, ec);
}
Common APIs and Types
WMoveLPendulumCommand, WMoveLCommand::arc_set_opt
Scenario 12: Arc Tracking
Applicable Scenarios During welding you need arc sensing to correct lateral or height direction.
Objective Bind selected path segments to a given ArcTrackParam set; segments without a track name do not track.
Recommended Steps
- Download the tracking parameter name with
setArcTrackParam(e.g.arctrackdata1). - Pass the tracking data name in overloads of
WMoveLCommandthat include the weave name; for arcs, use the equivalent overload if provided (see headers). - Typical queue:
ArcOnCommand→WeaveOnCommand→ multiple tracked weld moves →WeaveOffCommand→ArcOffCommand. - Wait for motion to finish and arc-off to complete (optionally combine with Scenario 18 event subscription).
Sample Code
/**
 * @brief 示例 - 电弧跟踪,点位适配机型NB4h-R580-XX
 */
void arcTrackExample() {
  error_code ec;
  //设置电弧跟踪参数
  ArcWelding::ArcTrackParam param;
  param.name = "arctrackdata1";
  param.annotation = "test1";
  param.delay_time = 5;//其他的值类似设置就行,这里直接使用默认值
  arcWeld().setArcTrackParam(param,ec);

  //获取对应的电弧跟踪参数
  auto param_get = arcWeld().getArcTrackParam(param.name, ec);
  std::cout << "name: " << param_get.name << " annotation: " << param_get.annotation << " delay_time: " << param_get.delay_time << std::endl;

  //本例验证时运行于NB4h-R580-3B(注意点位匹配)
  auto p0 = { 0.357487, 0.000633967, 0.222628, 3.0, 0.0685018, 3.12448 };
  auto p1 = { 0.357487, 0.143835, 0.222628, 3.13197, 0.0685018, 3.12448 };
  auto p2 = { 0.456268, 0.000634313, 0.222628, 3.13197, 0.0685026, 3.12448 };
  auto p3 = { 0.456268, 0.143835, 0.222628, 3.13197, 0.0685024, 3.12448 };
  auto p4 = { 0.456268, -0.103198, 0.222628, 3.13197, 0.068502, 3.12448 };

  ArcWelding::ArcOnCommand arcon("arcondata1", "arcdata1");
  ArcWelding::ArcOffCommand arcoff("arcoffdata1");
  MoveJCommand mj(p0, 100, 1);
  // 第一条,开启电弧跟踪,用跟踪参数arctrackdata1
  ArcWelding::WMoveLCommand wml1(p1, 20, 1, "weavedata1", "arctrackdata1");
  // 第二条,开启电弧跟踪,用跟踪参数arctrackdata2
  ArcWelding::WMoveLCommand wml2(p2, 20, 1, "weavedata1", "arctrackdata2");
  // 第三条,电弧跟踪参数为空,不跟踪
  ArcWelding::WMoveLCommand wml3(p3, 20, 1, "weavedata1");
  // 第四条和第五条,开启电弧跟踪,用跟踪参数arctrackdata2
  ArcWelding::WMoveLCommand wml4(p4, 20, 1, "weavedata1", "arctrackdata2");
  ArcWelding::WMoveLCommand wml5(p3, 20, 1, "weavedata1", "arctrackdata2");
  // 第六条,不跟踪
  ArcWelding::WMoveLCommand wml6(p2, 20, 1, "weavedata1"); // 直线摆动
  ArcWelding::WeaveOnCommand weaveon("weavedata1");
  ArcWelding::WeaveOffCommand weaveoff;
  auto wmove_list = {wml1, wml2, wml3, wml4, wml5, wml6};

  string id, move_id;
  robot.setPowerState(true, ec);
  robot.moveAppend(mj, move_id, ec);
  robot.moveAppend(arcon, id, ec); if(ec) std::cout << __LINE__ << ":" << ec.message() << std::endl;
  robot.moveAppend(weaveon, id, ec); if(ec) std::cout << __LINE__ << ":" << ec.message() << std::endl;
  robot.moveAppend(wmove_list, move_id, ec); if(ec) std::cout << __LINE__ << ":" << ec.message() << std::endl;
  robot.moveAppend(weaveoff, id, ec); if(ec) std::cout << __LINE__ << ":" << ec.message() << std::endl;
  robot.moveAppend(arcoff, id, ec); if(ec) std::cout << __LINE__ << ":" << ec.message() << std::endl;
  robot.moveStart(ec); if(ec) std::cout << __LINE__ << ":" << ec.message() << std::endl;

  waitForFinish(robot, move_id, (int)wmove_list.size() - 1);
  while(-1 != std::any_cast<int>(robot.queryEventInfo(Event::arcWeldState, ec).at(EventInfoKey::ArcWeldState::ArcWelding))) {
    // waiting for arc off
    std::this_thread::sleep_for(std::chrono::milliseconds (10));
  }
  print(std::cout, "Finish running");
}
Common APIs and Types
setArcTrackParam, getArcTrackParam, WMoveLCommand (overloads with tracking parameters), ArcOnCommand, WeaveOnCommand, WeaveOffCommand, ArcOffCommand
Notes
Tracking quality depends on the welder, wire, current waveform, and robot model; re-teach waypoints on this robot.
Arc tracking must be used together with weave enabled.
Scenario 13: Laser Search
Applicable Scenarios Before or during the main welding program, laser measurement is needed to obtain pose corrections for the seam or feature points.
Objective LaserSearchData is downloaded; executeLaserSearch returns within the agreed timeout; hand-eye data names match those referenced in the command.
Recommended Steps
- Basic setup for sensor networking, hand-eye relationship, and device connection is in Scenario 14 (
LaserSensorCfg,setHandeyeData,connLaserSensorDev, etc.). - Use
setLaserSearchDatato maintain the search process name and fields per the process package. - Build
LaserSearchCommand(hand-eye name, search data name, search pose, speed, etc.) and callexecuteLaserSearch; the application must guarantee sync/async behavior, timeout, and thread safety.
Sample Code
void LaserSearchExample() {
  // 保存手眼标定参数
  ArcWelding::HandeyeData handeyedata0;
  handeyedata0.mode = true;
  handeyedata0.xyz_abc = {29.456, -14.151, 70.047, 4.5006 / 180.0 * M_PI, 4.0438 / 180.0 * M_PI, -97.358 / 180.0 * M_PI};
  handeyedata0.name = "laserhandeyedata1";
  error_code ec;
  arcWeld().setHandeyeData(handeyedata0, ec);
  cout << "ec: " << ec.value() << ", " << ec.message() << endl;
  // 保存寻位参数
  ArcWelding::LaserSearchData laserSearchData{"lasersearchdata1", 2, "point", "continuous", 3, "lap_joint"};
  arcWeld().setLaserSearchData(laserSearchData, ec);
  cout << "ec: " << ec.value() << ", " << ec.message() << endl;

  CartesianPosition laserSearchPos;
  laserSearchPos.rpy = {3.14, 0, 3.14};
  laserSearchPos.trans ={0.563,0.3,0.43};
  ArcWelding::LaserSearchCommand laserSearchCmd("laserhandeyedata1","lasersearchdata1",laserSearchPos, 10, 0);
  bool isFound;
  CartesianPosition pos;
  std::tuple<bool, rokae::CartesianPosition> ret;
  // 示例中选择同步等待寻位结果,设置超时时间为 30 秒。可根据轨迹速度和长度来设置超时时间。
  std::chrono::seconds timeout(30);
  // 一、单独运动
  // 使用 std::async 启动一个线程执行 executeLaserSearch
  auto future = std::async(std::launch::async,
                           [laserSearchCmd, timeout]() {
                             error_code _ec;
                             auto r = arcWeld().executeLaserSearch(laserSearchCmd, false, timeout, _ec);
                             cout << "executeLaserSearch ec: " << _ec.value() << ", " << _ec.message() << endl;
                             return r;
                           });
  // 主线程执行 moveStart
  std::this_thread::sleep_for(std::chrono::seconds(1)); // 注意处理异步之间的顺序,这里用延时代替
  robot.moveStart(ec);
  cout << "ec: " << ec.value() << ", " << ec.message() << endl;
  // 等待异步线程完成
  ret = future.get();
  isFound = std::get<0>(ret);
  pos = std::get<1>(ret);
  std::cout << "isFound: " << isFound << ", pos: ";
  std::copy(pos.trans.begin(), pos.trans.end(), std::ostream_iterator<double>(std::cout, ", "));
  std::cout << "rpy: ";
  std::copy(pos.rpy.begin(), pos.rpy.end(), std::ostream_iterator<double>(std::cout, ", "));
  std::cout << std::endl;

  // 二、寻位并运动
  robot.moveReset(ec);
  ret = arcWeld().executeLaserSearch(laserSearchCmd, true,timeout, ec);
  cout << "ec: " << ec.value() << ", " << ec.message() << endl;
  isFound = std::get<0>(ret);
  pos = std::get<1>(ret);
  std::cout << "isFound: " << isFound << ", pos: ";
  std::copy(pos.trans.begin(), pos.trans.end(), std::ostream_iterator<double>(std::cout, ", "));
  std::cout << "rpy: ";
  std::copy(pos.rpy.begin(), pos.rpy.end(), std::ostream_iterator<double>(std::cout, ", "));
  std::cout << std::endl;
}
Common APIs and Types
setLaserSearchData, LaserSearchCommand, executeLaserSearch, HandeyeData (name referenced in the command)
Scenario 14: Laser Tracking — Sensor Setup, Connection, and Queue Usage
Applicable Scenarios Maintain laser IP, cycle, and type on the host; connect the device; seam tracking.
Objective The device can connect and be monitored; within the tracking segment, LaserTrackOnCommand–LaserTrackOffCommand share the queue with weld motion.
Recommended Steps (Configuration and Connection)
- Fill
LaserSensorCfg, callsetLaserSensorCfg; optionallysetEventWatcher(Event::lasertrackState, …). connLaserSensorDev/disconnLaserSensorDev; useremoveLaserSensorCfgwhen no longer needed.- Hand-eye:
setHandeyeData/getHandeyeData; auto calibration:startHandeyeCalibration→calibratePoint→calibrateEnd. - Track process name:
setLaserTrackData(fields per process package).
Recommended Steps (Seam Tracking Queue)
- After connecting,
openLaserTrack("sensor1", ec). - Queue:
ArcOnCommand→LaserTrackOnCommand→WMoveL/WMoveC, etc. →LaserTrackOffCommand→ArcOffCommand. closeLaserTrack, thendisconnLaserSensorDevas required.
Sample Code
In order, from the same example file: printLaserSensorState, setLaserSensorStateWatcher (registers callbacks for the config sample), LaserSensorSettingExample, LaserTrackCommandExample (uses shared ROKAE_EXE and waitForFinish).
//打印激光跟踪器状态
void printLaserSensorState(const EventInfo& info)
{
  using namespace rokae::EventInfoKey::LaserTrackState;
  print(std::cout, "[激光跟踪器状态信息] 设备名称: ", std::any_cast<std::string>(info.at(DeviceName)),
        " 连接:", std::any_cast<bool>(info.at(Connect)) ? "YES " : "NO ",
        "激光开启:", std::any_cast<bool>(info.at(LaserOn)) ? "YES " : "NO ",
        "使能开启:", std::any_cast<bool>(info.at(PowerOn)) ? "YES " : "NO ");//注意:明图传感器没有使能状态,这里的使能状态无效
}
// 激光跟踪器状态监视
void setLaserSensorStateWatcher()
{
  error_code ec;
  robot.setEventWatcher(rokae::Event::lasertrackState, printLaserSensorState, ec);
  if(ec) {
    print(std::cerr, "Set laser state watcher failed:", ec);
  }
}
/**
 * @brief 示例 - 激光传感器相关设置
 */
void LaserSensorSettingExample() {
  //设置激光跟踪器配置信息
  ArcWelding::LaserSensorCfg cfg;
  cfg.name = "sensor1";
  cfg.ip = "192.168.2.3";
  cfg.port = 502;
  cfg.overtime = 800;
  cfg.communication_cycle = 60;
  cfg.type = ArcWelding::LaserSensorType::CRNT;//创想传感器
  //cfg.type = ArcWelding::LaserSensorType::SMART_IMAGE;//明图传感器
  //cfg.type = ArcWelding::LaserSensorType::INTELLIGENT;//英莱传感器

  error_code ec;
  //发送指令设置AddLaserSensorCfg
  arcWeld().setLaserSensorCfg(cfg, ec);
  if (ec) cout << ec.message()<<std::endl;

  //查询设备配置信息
  ArcWelding::LaserSensorCfg cfg_get = arcWeld().getLaserSensorCfg(cfg.name, ec);
  cout << "name:" << cfg_get.name << "  ip:" << cfg_get.ip << endl;
  if (ec) cout << ec.message() << std::endl;

  //设置传感器状态监控watch
  setLaserSensorStateWatcher();

  //连接激光跟踪器ConnLaserTrack
  arcWeld().connLaserSensorDev(cfg.name, ec);
  if (ec) cout << ec.message() << std::endl;

  //断开连接DisConnLaserTrack
  arcWeld().disconnLaserSensorDev(cfg.name,ec);
  if (ec) cout << ec.message() << std::endl;

  //删除设备配置信息RemoveLaserSensorCfg
  arcWeld().removeLaserSensorCfg(cfg.name, ec);
  if (ec) cout << ec.message() << std::endl;

  //设置手眼标定结果
  ArcWelding::HandeyeData handeyedata0;
  handeyedata0.mode = true; // 使用XYZ_ABC的形式
  handeyedata0.xyz_abc = { 29.456,-14.151,70.047,4.5006 / 180.0 * M_PI,4.0438 / 180.0 * M_PI,-97.358 / 180.0 * M_PI };
  handeyedata0.name = "handeyedata0";
  arcWeld().setHandeyeData(handeyedata0, ec);
  if (ec) cout << ec.message() << std::endl;

  //查询手眼标定结果
  std::string name = "handeyedata0";
  auto handeyedata0_get = arcWeld().getHandeyeData(name, ec);
  if (ec) cout << ec.message() << std::endl;
  cout << "name:" << handeyedata0_get.name << "  xyz_abc:{" << handeyedata0_get.xyz_abc[0] << "," << handeyedata0_get.xyz_abc[2] << ","
       << handeyedata0_get.xyz_abc[2] << "," << handeyedata0_get.xyz_abc[3] << "," << handeyedata0_get.xyz_abc[4] << ","
       << handeyedata0_get.xyz_abc[5] << "}"<< endl;

  //删除手眼标定结果
  arcWeld().removeHandeyeData(name,ec);
  if (ec) cout << ec.message() << std::endl;
}
/**
 * @brief 示例 - 激光跟踪。点位适配机型XMS5
 */
void LaserTrackCommandExample(){
  error_code ec;
  // 设置传感器状态监控
  setLaserSensorStateWatcher();
  // 连接激光器
  arcWeld().connLaserSensorDev("sensor1", ec);
  if (ec) {
    print(std::cerr, "Connected laser sensor failed", ec);
    return;
  }

  ArcWelding::ArcOnCommand  arcOnCmd("arcondata1", "arcdata1");
  ArcWelding::ArcOffCommand arcOffCmd("arcoffdata1");
  ArcWelding::LaserTrackOnCommand laserTrackOnCmd; // 默认手眼标定参数和激光跟踪参数名为"default",参考设置这两个参数的方式设置
  ArcWelding::LaserTrackOffCommand laserTrackOffCmd;
  MoveJCommand movej {{0.614, 0.136, 0.389, -M_PI, 0, M_PI }, 500};
  ArcWelding::WMoveLCommand wmovel1 {{0.553, -0.107, 0.309, -M_PI, 0, M_PI}, 20};
  ArcWelding::WMoveLCommand wmovel2 {{0.553, 0.107, 0.309, -M_PI, 0, M_PI}, 20};
  string id, move_id;
  robot.setOperateMode(rokae::OperateMode::automatic, ec);
  robot.setPowerState(true, ec);
  if(ec) {
    print(std::cerr, "Set power state failed", ec);
    return;
  }

  // 打开激光传感器
  arcWeld().openLaserTrack("sensor1", ec);
  if(ec) {
    print(std::cerr, "Open laser sensor failed", ec);
    return;
  }

  ROKAE_EXE(robot.moveAppend(movej, move_id, ec));
  ROKAE_EXE(robot.moveAppend(arcOnCmd, id, ec));
  ROKAE_EXE(robot.moveAppend(laserTrackOnCmd, id, ec));
  ROKAE_EXE(robot.moveAppend({wmovel1, wmovel2}, move_id, ec));
  ROKAE_EXE(robot.moveAppend(laserTrackOffCmd,id, ec));
  ROKAE_EXE(robot.moveAppend(arcOffCmd, id, ec));
  ROKAE_EXE(robot.moveStart(ec));
  if(ec) return;

  waitForFinish(robot, move_id, 1);
  while(-1 != std::any_cast<int>(robot.queryEventInfo(Event::arcWeldState, ec).at(EventInfoKey::ArcWeldState::ArcWelding))) {
    // waiting for arc off
    std::this_thread::sleep_for(std::chrono::milliseconds (10));
  }

  // 关闭激光传感器
  ROKAE_EXE(arcWeld().closeLaserTrack("sensor1", ec));

  robot.setPowerState(false, ec);
  robot.setOperateMode(rokae::OperateMode::manual, ec);
}
Common APIs and Types
LaserSensorCfg, setLaserSensorCfg, connLaserSensorDev, openLaserTrack, closeLaserTrack, setLaserTrackData, LaserTrackOnCommand, LaserTrackOffCommand, GetLaserPos
Notes
Scenario 15: Multi-Pass Layers and Layer Offsets
Applicable Scenarios The same weld cross-section needs multiple passes, or each layer’s start pose is offset via LayerData.
Objective Layer/pass parameters are downloaded; optionally run reachability checks first, then use OffsetOnCommand / OffsetOffCommand in the motion queue to wrap each layer’s path.
Recommended Steps
- Use
setLayerDatato maintain each layer’s name, offsets, auxiliary points, etc. - Use
MpmlPathCheckon path point groups, motion type list, and layer list to collect unreachable layer names. - When needed,
GetLayerStartPointreturns a suggested arc-start pose. - In the queue, insert
OffsetOnCommand(layerName)before the layer path andOffsetOffCommandat layer end.
Sample Code
// 点位适配机型XMC7-R850-B0X1A0
void arcLayerExample() {
  std::string cmd_id;
  error_code ec;

    //设置多层多道参数
    ArcWelding::LayerData layerData1;
    layerData1.name = "layerdata1";
    layerData1.start_offset = 10;
    layerData1.end_offset = 01;
    layerData1.y_offset = 10;
    layerData1.z_offset = -0;
    layerData1.tilt_angle = 0;
    layerData1.travel_angle = 0;
    layerData1.layer_reverse = false;
    layerData1.offset_coord_system = 2;
    layerData1.aux_type = 3;//三点法
    //辅助点坐标值
    layerData1.aux_point_1 = {514, -136, 410};
    layerData1.aux_point_2 = {600, -120, 410};
    layerData1.aux_point_3 = {500, -100, 410};
    arcWeld().setLayerData(layerData1, ec);
    cout << "ec: " << ec.value() << ", " << ec.message() << endl;

    ArcWelding::LayerData layerData2;
    layerData2.name = "layerdata2";
    layerData2.start_offset = 0;
    layerData2.end_offset = 20;
    layerData2.y_offset = 50;
    layerData2.z_offset = -0;
    layerData2.tilt_angle = 0;
    layerData2.travel_angle = 10;
    layerData2.layer_reverse = true;
    layerData2.offset_coord_system = 2;
    layerData2.aux_type = 3;//三点法
    //辅助点坐标值
    layerData2.aux_point_1 = {514, -136, 410};
    layerData2.aux_point_2 = {600, -120, 410};
    layerData2.aux_point_3 = {500, -100, 410};
    arcWeld().setLayerData(layerData2, ec);
    cout << "ec: " << ec.value() << ", " << ec.message() << endl;

    ArcWelding::LayerData layerData3;
    layerData3.name = "layerdata3";
    layerData3.start_offset = 0;
    layerData3.end_offset = 0;
    layerData3.y_offset = 100;
    layerData3.z_offset = -0;
    layerData3.tilt_angle = 10;
    layerData3.travel_angle = 0;
    layerData3.layer_reverse = true;
    layerData3.offset_coord_system = 2;
    layerData3.aux_type = 3;//三点法
    //辅助点坐标值
    layerData3.aux_point_1 = {514, -136, 410};
    layerData3.aux_point_2 = {600, -120, 410};
    layerData3.aux_point_3 = {500, -100, 410};
    arcWeld().setLayerData(layerData3, ec);
    cout << "ec: " << ec.value() << ", " << ec.message() << endl;

    ArcWelding::OffsetOnCommand offset_on_command1("layerdata1");
    ArcWelding::OffsetOnCommand offset_on_command2("layerdata2");
    ArcWelding::OffsetOnCommand offset_on_command3("layerdata3");
    ArcWelding::OffsetOffCommand offset_off_command;
    ArcWelding::ArcOnCommand arc_on_command("arcondata1", "arcdata1");
    ArcWelding::ArcOffCommand arc_off_command("arcoffdata1");

    CartesianPosition pos1_1{{0.600, -0.136, 0.589, -M_PI, 0, M_PI}};
    CartesianPosition pos2_1{{0.500, -0.150, 0.489, -M_PI, 0, M_PI}};
    CartesianPosition pos3_1{{0.400, -0.150, 0.489, -M_PI, 0, M_PI}};
    CartesianPosition pos4_1{{0.300, -0.100, 0.489, -M_PI, 0, M_PI}};
    CartesianPosition pos4_aux_1{{0.200, -0.150, 0.489, -M_PI, 0, M_PI}};
    CartesianPosition pos5_1{{0.400, -0.150, 0.600, -M_PI, 0, M_PI}};
    CartesianPosition pos1_2{{0.600, -0.136, 0.389, -M_PI, 0, M_PI}};
    CartesianPosition pos2_2{{0.500, -0.150, 0.389, -M_PI, 0, M_PI}};
    CartesianPosition pos3_2{{0.400, -0.150, 0.389, -M_PI, 0, M_PI}};
    CartesianPosition pos1_3{{0.600, -0.136, 0.289, -M_PI, 0, M_PI}};
    CartesianPosition pos2_3{{0.500, -0.150, 0.289, -M_PI, 0, M_PI}};
    CartesianPosition pos3_3{{0.400, -0.150, 0.289, -M_PI, 0, M_PI}};
    MoveJCommand movej_pos1_1{pos1_1, 100};
    MoveLCommand movel_pos2_1{pos2_1, 20};
    MoveLCommand movel_pos3_1{pos3_1, 20};
    MoveLCommand movel_pos4_1{pos4_1, 20};
    ArcWelding::WMoveCCommand movec_pos4_1{pos4_1, pos4_aux_1, 20};
    movec_pos4_1.target.confData = {10, 25, -118, 0, -36, 6};
    MoveLCommand movel_pos5_1{pos5_1, 20};
    MoveJCommand movej_pos1_2{pos1_2, 100};
    MoveLCommand movel_pos2_2{pos2_2, 20};
    MoveLCommand movel_pos3_2{pos3_2, 20};
    MoveJCommand movej_pos1_3{pos1_3, 100};
    MoveLCommand movel_pos2_3{pos2_3, 20};
    MoveLCommand movel_pos3_3{pos3_3, 20};
    ArcWelding::WMoveLCommand arcwl1(pos3_1, 10, 1);


    std::vector<std::vector<CartesianPosition>> point_groups = {
      {pos2_1},
      {pos3_1},
      {pos4_aux_1, pos4_1},
    };

    std::vector<ArcWelding::MotionType> point_types = {
      ArcWelding::MotionType::MOVE_LINEAR,
      ArcWelding::MotionType::MOVE_LINEAR,
      ArcWelding::MotionType::MOVE_CIRCLE,
    };
    std::vector<std::string> error_layer_list;
    std::vector<ArcWelding::LayerData> layerdata_list;
    // 模拟两层共计三道可达性校验
    layerdata_list.push_back(layerData1);
    layerdata_list.push_back(layerData2);
    layerdata_list.push_back(layerData3);
    bool check_res = arcWeld().MpmlPathCheck(point_groups, point_types, layerdata_list, error_layer_list, ec);
    // 运动至起弧点示例
    rokae::CartesianPosition start_position;
    bool res = arcWeld().GetLayerStartPoint(point_groups, point_types, layerData2, start_position, ec);

    robot.setPowerState(true, ec);
    // 多层多道暂停|继续
    int index = 1;
    while (index < 4){
        // 偏移启动
        switch (++index) {
            case 1:
                robot.moveAppend(offset_on_command1, cmd_id, ec);
                break;
            case 2:
                robot.moveAppend(offset_on_command2, cmd_id, ec);
                break;
            case 3:
                robot.moveAppend(offset_on_command3, cmd_id, ec);
                break;
            default:
                break;
        }
        if (index == 3)
            robot.moveStart(ec, true);//暂停层道继续执行
        robot.moveAppend(movej_pos1_1, cmd_id, ec);//0.600, -0.136, 0.589
        robot.moveAppend(offset_on_command1, cmd_id, ec);
        robot.moveAppend(movel_pos2_1, cmd_id, ec);//0.500, -0.150, 0.489
        robot.moveAppend(arc_on_command, cmd_id, ec);
        robot.moveAppend(arcwl1, cmd_id, ec);//0.400, -0.150, 0.489
        robot.moveAppend(movec_pos4_1, cmd_id, ec);//0.400, -0.150, 0.600
        robot.moveAppend(arc_off_command, cmd_id, ec);
        robot.moveAppend(offset_off_command, cmd_id, ec);
        if (index == 2)
            robot.moveAppend(movel_pos4_1, cmd_id, ec, true);//0.400, -0.150, 0.589
        else
            robot.moveAppend(movel_pos4_1, cmd_id, ec);//0.400, -0.150, 0.589
        robot.moveStart(ec);
        index++;
    }

    robot.setPowerState(false, ec);
}
Common APIs and Types
setLayerData, getLayerData, removeLayerData, LayerData, MpmlPathCheck, GetLayerStartPoint, OffsetOnCommand, OffsetOffCommand
Scenario 16: Full Circle and Complex Curves (Weave / Seg / Tracking Optional)
Applicable Scenarios The seam is a full circle or MoveCF-style curve, optionally with weave, stitch welding, or arc tracking.
Objective Combine WMoveCFCommand with process commands; the exact stacking order follows modes in comments and must be validated with the process package.
Recommended Steps
- Build
WMoveCFCommandfor the circle or curve using auxiliary and target points as required by the process package. - After
setWeaveData,setSegData,setArcTrackParamas needed, bind names on commands or insertSegOnCommandin the queue. - Verify path and orientation in simulation or dry run, then switch to live welding.
Sample Code
void wmovecfExample() {
  // 点位机型 XMC7-R850-W7G3B4C
  cout << "enter exampleCommand" << endl;
  auto rlPoint2sdkPoint = [](const std::vector<double> &rlPoint) -> std::array<double, 6> {
    std::array<double, 6> sdkPoint;
    for (int i = 0; i < 3; i++) {
      sdkPoint[i] = rlPoint[i] / 1000.0;
    }
    for (int i = 3; i < 6; i++) {
      sdkPoint[i] = rlPoint[i] / 180.0 * M_PI;
    }
    return sdkPoint;
  };
  error_code ec;
  ArcWelding::ArcOnCommand arcon("arcondata1", "arcdata1");
  ArcWelding::ArcOffCommand arcoff("arcoffdata1");
  ArcWelding::SegOnCommand segon("segdata1");
  ArcWelding::SegOffCommand segooff;
  ArcWelding::WeaveOnCommand weaveon("weavedata1");
  ArcWelding::WeaveOffCommand weaveoff;
  std::vector<double> p1point({556.769126, 101.641184, 358.852436, 158.661084, -17.184105, -148.826026});
  std::vector<double> p2point({590.049781, 101.641177, 358.852421, 158.66108, -17.184102, -148.826024});
  std::vector<double> p3point({556.769146, 17.242862, 358.852448, 179.999964, -0.000009, -179.999957});
  std::vector<double> p4point({556.769126, 101.641184, 358.852436, 179.999964, -0.000009, -179.999957});
  std::vector<double> p5point({590.049781, 101.641177, 358.852421, 179.999964, -0.000009, -179.999957});
  CartesianPosition p1(rlPoint2sdkPoint(p1point));
  CartesianPosition p2(rlPoint2sdkPoint(p2point));
  CartesianPosition p3(rlPoint2sdkPoint(p3point));
  CartesianPosition p4(rlPoint2sdkPoint(p4point));
  CartesianPosition p5(rlPoint2sdkPoint(p5point));
  ArcWelding::WMoveLCommand wml(p3, 200, 1);
  ArcWelding::WMoveCFCommand wmcf(p2, p1, 300 / 180.0 * M_PI);
  ArcWelding::WMoveCFCommand wmcf2(p4, p5, 300 / 180.0 * M_PI);

  // 设置旋转类型
  // wmcf.rotType = MoveCFCommand::constPose;
  wmcf.rotType = MoveCFCommand::constPose;
  // wmcf.rotType = MoveCFCommand::rotAxis;

  string id;

  // 单独整圆运动
  // robot.moveAppend(arcon, id, ec);
  // robot.moveAppend(wmcf, id, ec);
  // robot.moveAppend(arcoff, id, ec);
  // robot.moveStart(ec);

  // 搭配摆动运动
  // wmcf.setWeaveData("weavedata1", ec);
  // robot.moveAppend(arcon, id, ec);
  // robot.moveAppend(weaveon, id, ec);
  // robot.moveAppend(wmcf, id, ec);
  // robot.moveAppend(weaveoff, id, ec);
  // robot.moveAppend(arcoff, id, ec);
  // robot.moveStart(ec);

  // 搭配间断焊运动
  // robot.moveAppend(arcon, id, ec);
  // robot.moveAppend(segon, id, ec);
  // robot.moveAppend(wmcf, id, ec);
  // robot.moveAppend(segooff, id, ec);
  // robot.moveAppend(arcoff, id, ec);
  // robot.moveStart(ec);

  // 搭配电弧跟踪,需要搭配摆动
  // wmcf.setWeaveData("weavedata1", ec);
  // wmcf.setTrackData("arctrackdata1", ec);
  // robot.moveAppend(arcon, id, ec);
  // robot.moveAppend(weaveon, id, ec);
  // robot.moveAppend(wmcf, id, ec);
  // robot.moveAppend(weaveoff, id, ec);
  // robot.moveAppend(arcoff, id, ec);
  // robot.moveStart(ec);

  // arcdata中设置了断弧回退距离,暂停后继续运动会回退,需要有前置轨迹
  // robot.setDefaultConfOpt(false,ec);
  // robot.moveAppend(arcon, id, ec);
  // robot.moveAppend(wml, id, ec);
  // robot.moveAppend(wmcf, id, ec);
  // robot.moveAppend(arcoff, id, ec);
  // robot.moveStart(ec);
  // std::this_thread::sleep_for(std::chrono::milliseconds(4000));
  // robot.stop(ec); // 暂停
  // std::this_thread::sleep_for(std::chrono::milliseconds(1000));
  // robot.moveStart(ec);// 继续
}
Common APIs and Types
WMoveCFCommand, MoveCFCommand::rotType
Scenario 17: Field Auxiliary Actions and Welder Status
Applicable Scenarios Torch alignment; wire feed / retract / gas check before arc start; short tack / rivet welding; reading live welder values or clearing alarms; without an actual weld, use enableArcData to select the work mode and push current/voltage mode and setpoints to the welder, then compare the welder panel with the host for consistency.
Objective Maintenance actions work without a full weld trajectory; the HMI can display welder status.
Recommended Steps
- Wire feed, retract, gas check: call
feedOnWire,feedBackWire,detectGas, etc.; duration must meet the process-package minimum (e.g. greater than 0.1 s); use the enable parameter in the corresponding overload to stop (see appendix methods). - Tack welding:
startWelding/stopWelding; distinguish synergic vs. separate modes, etc. (see API reference). - Status:
getWelderStatus; when alarms are clearable,clearWelderAlarm. enableArcData: Activates one weld process dataset on the welder side (work mode, current/voltage modes, and current/voltage setpoints, etc.); it is not persisted. Call without starting a full weld process, then compare the welder display with host values for field verification (prerequisites such as not using a virtual machine and having the welder connected are in the code comments below).
Sample Code
In order from the same file: feedOnWire, feedBackWire, detectGas, getWelderState, exampleWelding, clearWelderAlarm, enableArcData.
// 送丝
void feedOnWire()
{
  cout << "enter feedOnWire" << endl;
  error_code ec;

  double time = 0;
  arcWeld().feedOnWire(time, ec); // 时间需要大于0.1,小于0.1错误码报错
  cout << "ec: " << ec.value() << ", " << ec.message() << endl;

  time = 10;
  arcWeld().feedOnWire(time, ec); // 时间大于0.1,错误码正常
  cout << "ec: " << ec.value() << ", " << ec.message() << endl;

  std::this_thread::sleep_for(std::chrono::seconds(2));

  arcWeld().feedOnWire(time, ec,false); // 停止送丝
  cout << "ec: " << ec.value() << ", " << ec.message() << endl;
}
// 退丝
void feedBackWire()
{
  cout << "enter feedBackWire" << endl;

  error_code ec;
  double time = 0;
  arcWeld().feedBackWire(time, ec); // 时间需要大于0.1,小于0.1错误码报错
  cout << "ec: " << ec.value() << ", " << ec.message() << endl;

  time = 10;
  arcWeld().feedBackWire(time, ec); // 时间大于0.1,错误码正常
  cout << "ec: " << ec.value() << ", " << ec.message() << endl;

  std::this_thread::sleep_for(std::chrono::seconds(2));

  arcWeld().feedBackWire(time, ec,false); // 停止退丝
  cout << "ec: " << ec.value() << ", " << ec.message() << endl;
}
// 送气
void detectGas()
{
  cout << "enter detectGas" << endl;
  error_code ec;

  double time = 0;
  arcWeld().detectGas(time, ec); // 时间需要大于0.1,小于0.1错误码报错
  cout << "ec: " << ec.value() << ", " << ec.message() << endl;

  time = 2;
  arcWeld().detectGas(time, ec); // 时间大于0.1,错误码正常
  cout << "ec: " << ec.value() << ", " << ec.message() << endl;

  std::this_thread::sleep_for(std::chrono::seconds(2));

  arcWeld().detectGas(time, ec,false); // 停止检气
  cout << "ec: " << ec.value() << ", " << ec.message() << endl;
}
// 获取焊机状态
void getWelderState()
{
  cout << "enter getWelderState" << endl;
  error_code ec;

  auto welderState = arcWeld().getWelderStatus(ec);
  cout << "ec: " << ec.value() << ", " << ec.message() << endl;
  cout << "state: " << welderState.state << endl;
  cout << "current: " << welderState.current << endl;
  cout << "voltage: " << welderState.voltage << endl;
  cout << "speed: " << welderState.speed << endl;
  cout << "welding_name: " << welderState.welding_name << endl;
  cout << "arc_welding: " << welderState.arc_welding << endl;
  cerr << "runing_error: " << welderState.running_error.value() << "," << welderState.running_error.message() << endl;
  cout << "distance: " << welderState.welding_distance << endl;
  cout << "welding_time: " << welderState.welding_time << endl;
  cout << "welding_wire_used: " << welderState.welding_wire_used << endl;
  cout << "welding_path_num: " << welderState.welding_path_num << endl;
  cout << "welder_error_code: " << welderState.welder_error_code << endl;
  cout << "welder_ready: " << welderState.welder_ready << endl;
}
// 铆焊
void exampleWelding(){
  error_code ec;
  cout << "enter exampleWelding" << endl;
  arcWeld().startWelding(100,0,ec); // 默认一元化
  cout << "ec: " << ec.value() << ", " << ec.message() << endl;

  arcWeld().startWelding(100,10,ec,"separate"); // 分别模式
  cout << "ec: " << ec.value() << ", " << ec.message() << endl;

  std::this_thread::sleep_for(std::chrono::seconds(2));
  arcWeld().stopWelding(ec);
  cout << "ec: " << ec.value() << ", " << ec.message() << endl;
}
// 清焊机面板告警
void clearWelderAlarm() {
  error_code ec;
  arcWeld().clearWelderAlarm(ec);
  cout << "ec: " << ec.value() << ", " << ec.message() << endl;
}
// 生效参数
void enableArcData(){
  cout << "enter enableArcData" << endl;
  // 不能为虚拟机并且需要连接焊机
  ArcWelding::ArcData arcData = {
    "example_arcdata", "example_annotation", "low_spatter", "wire_feed", "unified", 100, 20,0, 30, 400, {500, "auto_arc_reignition", 15}};
  error_code ec;
  arcWeld().enableArcData(arcData, ec);
  cout << "ec: " << ec.value() << ", " << ec.message() << endl;
}
Common APIs and Types
feedOnWire, feedBackWire, detectGas, startWelding, stopWelding, getWelderStatus, clearWelderAlarm, enableArcData (usage: step 4 in Recommended Steps above; samples in code blocks above), FeedOnWireCommand, FeedBackWireCommand
Scenario 18: Runtime Monitoring
Applicable Scenarios Subscribe in application code to weld current/voltage, arc weld state, motion segment completion, etc.
Objective Obtain a consistent state snapshot via async callback or active polling; infer segment end from trajectory id and waypoint index.
Recommended Steps
setEventWatcher(Event::arcWeldState, callback, ec)registers the welder state callback; parse keys underEventInfoKey::ArcWeldState.setEventWatcher(Event::moveExecution, ...)or poll withqueryEventInfo, combined with your “segment complete” rule (e.g. trajectory id + waypoint index).- Whether arc-off is complete can be inferred from fields such as “still welding” in arc weld state (exact keys per process package and SDK).
Sample Code
In order: printWeldState, setArcWeldStateWatcher, queryWeldState, printMoveState, setMoveStateWatcher.
void printWeldState(const EventInfo &info)
{
  using namespace EventInfoKey::ArcWeldState;
  double current = std::any_cast<double>(info.at(Current));
  double voltage = std::any_cast<double>(info.at(Voltage));
  string state = std::any_cast<string>(info.at(State));
  int speed = std::any_cast<int>(info.at(Speed));
  auto error = std::any_cast<error_code>(info.at(RunningError));
  string weldingName = std::any_cast<string>(info.at(WeldingName));
  int arcWelding = std::any_cast<int>(info.at(EventInfoKey::ArcWeldState::ArcWelding));
  double distance = std::any_cast<double>(info.at(WeldingDistance));
  double welding_time = std::any_cast<double>(info.at(WeldingTime));
  double welding_wire_used = std::any_cast<double>(info.at(WeldingWireUsed));
  int welder_error_code = std::any_cast<int>(info.at(WelderErrorCode));
  bool welder_ready = std::any_cast<bool>(info.at(WelderReady));


  cout << "[焊接状态] current: " << current << ", voltage: " << voltage << ", state: " << state << ", speed: " << speed << endl;
  cout << "weldingName: " << weldingName << ", arcWelding: " << arcWelding << ", welding_time: " << welding_time << ", welding_wire_used: " << welding_wire_used
       << ", welder_error_code: " << welder_error_code << ", welder_ready: " << welder_ready << "." << endl;
  if(info.count(WeldingPathNum)) {
    int weldingPathNum = std::any_cast<int>(info.at(WeldingPathNum));
    std::cout << "Distance: " << distance << " m, PathNum: " << weldingPathNum << "." << std::endl;
  } else {
    std::cout << "Distance: " << distance << " m." << std::endl;
  }
  if(error) {
    std::cerr << "运行错误:" << error << std::endl;
  }
}
void setArcWeldStateWatcher()
{
  error_code ec;
  robot.setEventWatcher(rokae::Event::arcWeldState, printWeldState, ec);
  if(ec) {
    print(std::cerr, "设置焊接状态监视失败:", ec);
  }
}
void queryWeldState()
{
  error_code ec;
  auto info = robot.queryEventInfo(Event::arcWeldState, ec);
  printWeldState(info);
}
void printMoveState(const EventInfo &info)
{
  using namespace rokae::EventInfoKey::MoveExecution;
  print(std::cout, "[运动执行信息] ID:", std::any_cast<std::string>(info.at(ID)), "Index:", std::any_cast<int>(info.at(WaypointIndex)),
        "已完成: ", std::any_cast<bool>(info.at(ReachTarget)) ? "YES": "NO", std::any_cast<error_code>(info.at(Error)),
        std::any_cast<std::string>(info.at(Remark)));
}
void setMoveStateWatcher()
{
  error_code ec;
  robot.setEventWatcher(rokae::Event::moveExecution, printMoveState, ec);
  if(ec) {
    print(std::cerr, "设置运动事件监视失败:", ec);
  }
}
Common APIs and Types
setEventWatcher, queryEventInfo, Event::arcWeldState, Event::moveExecution, EventInfoKey::ArcWeldState, EventInfoKey::MoveExecution
Notes
- The welder state callback period is 500 ms.
Scenario 19: Other Geometry and Process Helpers (As Needed)
Applicable Scenarios User reference from three points; welder capability / mode query; jog offset during welding, etc.
Objective Perform auxiliary geometry in code or read welder capability lists.
Recommended Steps
- Call
getRefBy3Points,getWelderWorkModes,weldOffsetJog, etc. as needed for your application.
Sample Code
In order: getRefBy3PointsExample, getWelderWorkModes, weldingJogOffsetExample.
void getRefBy3PointsExample() {
  error_code ec;
  // auto ret = robot.posture(CoordinateType::endInRef,ec);
  CartesianPosition pos1{0.55676914536239797, -0.15000000000000005, 0.35885244785437498, -3.1415926535897931, 3.8857805861880484e-16, -3.1415926535897931};
  CartesianPosition pos2{0.71096662191265758, -0.14999999687989679, 0.35885244769618885, -3.1415921387343229, 8.5631816663676866e-07, 3.1415926369370966};
  CartesianPosition pos3{0.71096662302702562, 0.0055997244168811289, 0.35885244730431071, -3.1415926429162764, 7.8093868108499471e-07, -3.1415918107904255};
  bool with_origin = false;
  ArcWelding::DirType dir = ArcWelding::DirType::X_Plus_Y_Plus;
  auto ret = arcWeld().getRefBy3Points(std::vector<CartesianPosition>{pos1, pos2, pos3}, with_origin, dir, ec);
  cout << "getRefBy3PointsExample: ec: " << ec.value() << ", " << ec.message() << endl;
  for (auto &p : ret.trans) {
    cout << p << " ";
  }
  for (auto &p : ret.rpy) {
    cout << p << " ";
  }
}
void getWelderWorkModes() {
  error_code ec;
  auto ret = arcWeld().getWelderWorkModes(ec);
  cout << "getWelderWorkModes: ec: " << ec.value() << ", " << ec.message() << endl;
  cout << "work modes: ";
  for (auto &p : ret) {
    cout << p << " ";
  }
  cout << endl;
}
void weldingJogOffsetExample() {
  error_code ec;
  arcWeld().weldOffsetJog(ArcWelding::WeldOffsetJogDir::Y_PLUS,ec);
  arcWeld().weldOffsetJog(ArcWelding::WeldOffsetJogDir::Y_MINUS,ec);
  arcWeld().weldOffsetJog(ArcWelding::WeldOffsetJogDir::Z_PLUS,ec);
  arcWeld().weldOffsetJog(ArcWelding::WeldOffsetJogDir::Z_MINUS,ec);
  cout << "weldingJogOffset: ec: " << ec.value() << ", " << ec.message() << endl;
}
Common APIs and Types
getRefBy3Points, getWelderWorkModes, weldOffsetJog
Related Documentation
| Need | Document |
|---|---|
| API list and parameter meanings | API Description |
| Types and data structures | Appendix: Types, Appendix: Data Structures |
| Method signatures and overloads | Appendix: Methods |
| Error codes and exceptions | Error Codes and Exceptions |